
Blog
Fiber Cement Board Screw Heads Showing Through Paint: Causes and Prevention
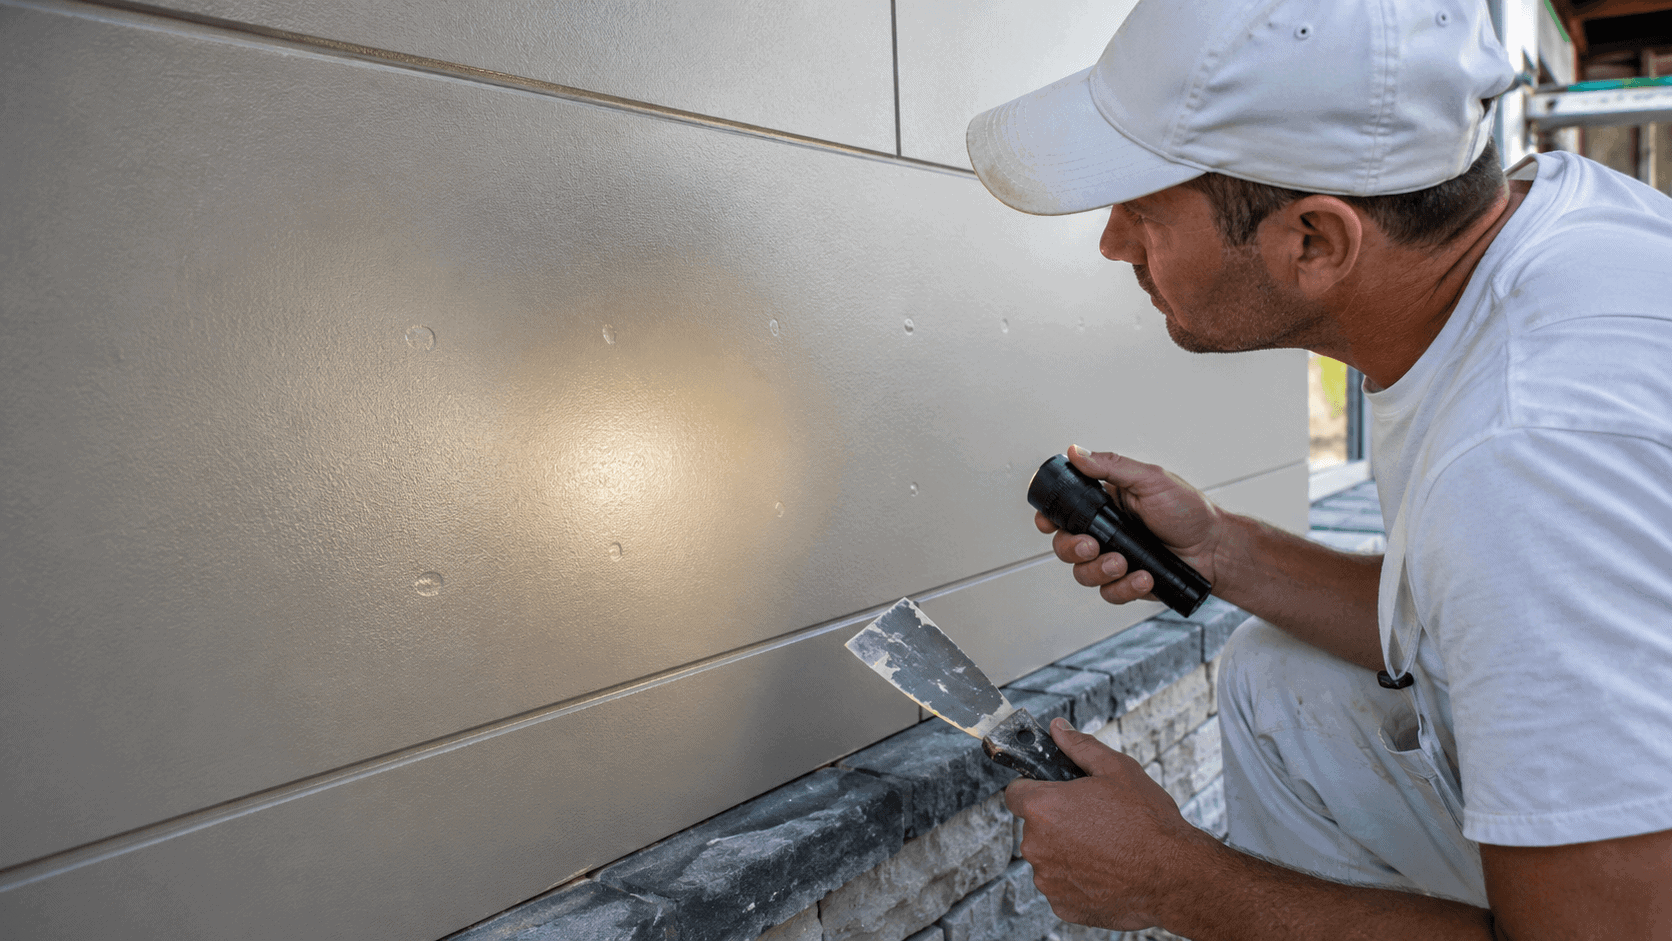
Fiber cement board screw heads showing through paint can make an otherwise well-installed wall look unfinished.
The problem may appear as circular marks, raised spots, shallow depressions, dark rings, rust stains, or visible filler patches. In some cases, the screw heads look acceptable before painting but become obvious after the final coat dries.
This effect is often called telegraphing. It happens when the fixing point or repair area becomes visible through the finished surface.
The problem is not usually caused by paint alone. It often begins with screw selection, fixing depth, filler application, surface movement, moisture, or poor preparation.
Fiber cement boards can provide a smooth and professional painted finish. However, screw heads must be installed, filled, prepared, and coated correctly.
For installers, contractors, and specifiers, the key point is simple: visible screw heads are usually preventable when the fixing and finishing process is planned as one complete system.
Why Screw Heads Become Visible Through Paint
A painted fiber cement board surface contains several layers.
These may include:
- Fiber cement board
- Screw fixing
- Filler or repair compound
- Sanded repair area
- Primer
- Paint or coating
Each layer must work with the others.
If the screw sits too high, it may remain visible as a raised circle. If it sits too deep, the damaged area may require too much filler. If the filler shrinks, a shallow depression may appear.
Paint can make these small differences easier to see, especially under strong lighting or with smooth, glossy finishes.
What Does Screw-Head Telegraphing Look Like?
Screw-head telegraphing can appear in several ways.
Common signs include:
- Circular marks visible through paint
- Small raised bumps
- Shallow depressions over screw heads
- Dark rings around fixings
- Uneven filler patches
- Different paint texture around screws
- Hairline cracks around filled areas
- Rust-coloured stains
- Visible fixing lines across the wall
The marks may follow the stud or batten positions because the screws are installed in regular vertical or horizontal lines.
This can make the problem very noticeable on large, smooth wall surfaces.
The Screw Head Is Sitting Too High
A screw head that remains proud of the board surface can show through paint.
The installer may try to hide it with filler. However, the filler layer may need to be too thick. This can create a visible raised patch.
A proud screw head may be caused by:
- Wrong screw type
- Incorrect screw length
- Unsuitable screw head design
- Weak driver power
- Incorrect drill point for steel framing
- Poor fixing technique
- Hard or thick metal profiles
- Debris between the board and frame
The correct solution is not to cover a badly seated screw with more filler.
The screw should sit in the position required by the board and fixing system without damaging the board surface.
The Screw Has Been Driven Too Deep
Overdriven screws are another common cause.
When a screw is driven too deeply, it can crush or break the surface around the fixing point. This creates a larger recess that must be filled.
The damaged area may later become visible because:
- The filler shrinks
- The surrounding board surface is weakened
- The recess is too deep
- The filler thickness is uneven
- Small cracks form around the fixing
- The screw no longer holds the board correctly
Driving the screw deeper does not automatically create a better concealed fixing.
The screw should hold the board firmly without crushing the face.
Incorrect Screw Type Can Affect the Finish
Not every screw is suitable for fiber cement boards.
The screw must match:
- Board thickness
- Steel or timber support
- Metal profile thickness
- Internal or external exposure
- Required corrosion resistance
- Fixing system
- Final surface finish
An unsuitable screw head may not sit correctly. It may remain raised, cut too deeply into the board, or create an irregular recess.
Drywall screws should not be treated as a universal alternative. They may have the wrong head shape, coating, strength, or corrosion resistance for the application.
A compatible fiber cement board screw helps create a more controlled fixing point.
Filler Shrinkage Is a Major Cause
Filler shrinkage is one of the most common reasons screw heads become visible after painting.
A repair area may look smooth when first filled. As the material dries or cures, it can lose volume.
This creates a small depression over the screw head.
The problem is more likely when:
- The filler is applied too thickly
- Only one heavy coat is used
- The filler is not suitable for cement-based boards
- The material contains too much water
- The drying period is too short
- Painting starts before full curing
- The repair area is deep
- Site conditions are cold or humid
Applying more filler does not always solve the problem if the product itself is unsuitable.
Use a compatible filler or repair compound that is suitable for the board, application, exposure level, and final coating.
One Thick Filler Layer Can Create Problems
Installers may try to complete the repair quickly with one thick application.
However, thick filler layers may dry unevenly. The surface can appear ready while the deeper material is still curing.
This may lead to:
- Shrinkage
- Cracking
- Soft filler
- Uneven sanding
- Poor primer adhesion
- Visible repair patches
Several controlled applications may perform better than one heavy layer when the fixing recess is deep.
Allow each layer to dry or cure according to the product instructions before applying the next layer.
Poor Surface Cleaning Weakens the Repair
Dust can remain around screw heads after cutting, drilling, sanding, or installation.
If filler is applied over dust, it may not bond properly to the board.
Poor adhesion can cause:
- Loose filler
- Edge cracking
- Visible rings
- Surface flaking
- Uneven paint absorption
- Early repair failure
Before filling screw heads, clean the board surface carefully.
The area should be:
- Dry
- Dust-free
- Free from grease
- Free from loose particles
- Free from mud or site contamination
- Ready for the selected filler
Do not rely on filler to trap loose dust against the board.
The Filler and Board May Be Incompatible
The filler must bond to a cementitious board surface.
A product designed only for gypsum-based boards or light internal repairs may not be suitable for fiber cement boards, especially outdoors.
Before selecting a filler, check:
- Is it suitable for cement-based surfaces?
- Can it be used internally or externally?
- Is it compatible with the final primer?
- Is it compatible with the paint system?
- Can it handle the required filling depth?
- Is it resistant to shrinkage?
- Is it suitable for moisture-prone areas?
- Does the coating manufacturer accept it?
Using a compatible system reduces the risk of visible patches and repeated repairs.
Filler Has Not Dried or Cured Fully
Painting too soon is a common site mistake.
The filler may feel dry on the surface but still contain moisture deeper inside.
If primer or paint is applied too early, the repair may continue to shrink underneath the coating.
This can create:
- Depressions
- Colour differences
- Soft patches
- Cracks
- Poor paint adhesion
- Slow drying
- Visible circles over fixings
Follow the filler manufacturer’s drying and curing instructions.
Temperature, humidity, airflow, and filler thickness can all affect the required waiting time.
Uneven Sanding Can Reveal Fixing Points
Sanding should blend the filled area into the surrounding board surface.
If the filler is not sanded enough, a raised patch may remain. If it is sanded too aggressively, a depression may form.
Over-sanding can also damage the board face around the screw.
Good sanding should create a smooth transition between:
- Original board surface
- Filled fixing recess
- Surrounding repair area
Inspect the surface from different angles before priming.
Side lighting is especially useful because it reveals raised or sunken areas that may not be visible under normal site lighting.
Primer Has Been Skipped
Primer helps create a more uniform surface before painting.
The bare board, filler, and sanded areas may absorb paint differently. If primer is skipped, these differences can become visible after the final coat.
Primer can help:
- Control surface suction
- Improve paint adhesion
- Reduce patchiness
- Bind minor surface dust
- Create a more even background
- Reduce visible filler areas
Some systems may require spot priming over repairs. Others may require full-surface priming.
Follow the coating system instructions rather than assuming one approach suits every application.
Spot Priming Can Still Leave Visible Patches
Spot priming is useful in some systems, but it may create a different surface texture or absorption rate from the surrounding board.
This can make repaired areas visible under certain paints.
A full primer coat may give a more uniform background, especially on:
- Large smooth walls
- High-visibility interiors
- Strongly lit surfaces
- Dark paint colours
- Low-sheen or glossy finishes
- Areas with many filled screw heads
The correct method depends on the board and coating system.
A small test area can help confirm whether spot priming is enough.
Paint Sheen Can Make the Problem More Visible
Smooth and glossy paints reflect more light.
This can make minor surface differences easier to see.
Screw-head marks may be especially visible with:
- Gloss paint
- Semi-gloss paint
- Dark colours
- Smooth coatings
- Strong side lighting
- Long uninterrupted walls
- Large windows
- Artificial lighting close to the wall
A matt finish may hide small surface variations better, but it should not be used as a substitute for correct preparation.
The surface should still be properly fixed, filled, sanded, and primed.
Strong Side Lighting Reveals Small Defects
Lighting has a major effect on final appearance.
Light that travels across the wall surface at a low angle can reveal every small bump, dip, joint, or filler patch.
This is common near:
- Windows
- Glazed façades
- Corridor lighting
- Wall-mounted lights
- Spotlights
- Long interior walls
- Exterior façades exposed to low sunlight
The inspection method should reflect the final lighting conditions.
A wall that looks smooth under general site lighting may look different after the building is completed.
Board or Frame Movement Can Create Marks
Even a well-filled screw head may become visible if the board or support frame moves.
Movement can come from:
- Timber shrinkage
- Wet timber battens
- Steel frame movement
- Incorrect support spacing
- Unsupported board edges
- Thermal expansion
- Moisture changes
- Loose fixings
- Building movement
- Missing movement joints
Movement can cause hairline cracks around screw heads or push the filler away from the board surface.
This is why fixing-point appearance is not only a finishing issue. It is also an installation and system-design issue.
Moisture Can Affect Filled Screw Heads
Moisture exposure can change the appearance of filled fixing points.
This is especially important in:
- External walls
- Wet areas
- Balconies
- Terraces
- Façades
- Unfinished buildings
- Poorly ventilated spaces
- Areas with leaks or condensation
Moisture can contribute to:
- Filler softening
- Uneven drying
- Coating failure
- Dark rings
- Staining
- Local movement
- Poor adhesion
Do not paint boards that are wet, contaminated, or exposed to unresolved moisture problems.
The complete wall system must manage drainage, ventilation, membranes, flashings, and drying.
Rust Stains Can Appear Around Fixings
If the wrong screw is used in a damp or external environment, corrosion may develop.
Rust can appear as:
- Brown circles
- Orange marks
- Dark streaks
- Stains following fixing lines
- Discolouration through paint
Painting over corrosion does not solve the cause.
External and moisture-exposed applications need fixings with suitable corrosion resistance for the environment.
The correct corrosion class may depend on humidity, coastal exposure, chemicals, and the full façade design.
How to Prevent Screw Heads Showing Through Paint
Prevention starts during framing and fixing, not during painting.
A reliable process should include the following steps.
Choose the Correct Screw
Select a screw that suits the fiber cement board, support frame, exposure level, and finishing method.
Check the screw head, length, thread, drill point, and corrosion resistance.
Check the Support Frame
Make sure steel studs, timber battens, or other supports are straight, stable, and correctly spaced.
The board should sit flat against the frame.
Use Controlled Driving
Use a depth-controlled or torque-controlled driver.
Stop when the screw head reaches the correct position. Avoid uncontrolled impact or excessive force.
Inspect Every Fixing
Before filling, check for:
- Proud screw heads
- Overdriven screws
- Broken board faces
- Loose fixings
- Cracks
- Incorrect edge distance
- Unsupported areas
Repair or replace defective fixings before finishing starts.
Clean the Surface
Remove dust and loose particles from the screw recess and surrounding board.
The surface must be suitable for filler application.
Use a Compatible Filler
Choose a product approved for cement-based boards and the final exposure conditions.
Do not select filler only because it is easy to sand.
Apply Filler in Controlled Layers
Avoid one unnecessarily thick application.
Allow each layer to dry or cure according to the product guidance.
Sand Carefully
Blend the filled area into the surrounding board without damaging the face.
Use suitable lighting to check the surface.
Prime Correctly
Apply spot primer or full-surface primer as required by the coating system.
Make sure filled areas do not absorb paint differently from the surrounding board.
Apply Compatible Paint
Use a paint or coating suitable for fiber cement board and the application environment.
Follow the required number of coats and drying times.
How to Repair Visible Screw Heads After Painting
If screw heads are already visible, adding another paint coat may not solve the problem.
First identify the cause.
A practical repair process may include:
- Inspect the fixing point.
- Check whether the screw is proud, overdriven, loose, or corroded.
- Correct or replace the screw where necessary.
- Remove loose paint and unstable filler.
- Clean the repair area.
- Apply a compatible filler in controlled layers.
- Allow it to dry or cure fully.
- Sand the area smoothly.
- Apply the correct primer.
- Repaint the repair area or the wider wall section as needed.
Local touch-up painting may remain visible if the surrounding paint has aged, faded, or developed a different texture.
In high-visibility areas, repainting a larger section may provide a more uniform result.
Do Not Simply Add More Filler Over Paint
Applying filler directly over a painted defect may create another weak layer.
The existing paint may have poor adhesion, contamination, or movement underneath it.
Before refilling, check whether the repair area needs to be taken back to a clean and stable surface.
The repair should bond to the correct substrate, not to loose paint.
External Fixing Points Need Extra Care
For exterior painted fiber cement boards, screw-head preparation should consider:
- Weather exposure
- Water entry
- UV exposure
- Temperature change
- Corrosion resistance
- Flexible movement
- Exterior-grade filler
- Exterior primer
- Compatible coating
Internal repair materials may not be suitable outdoors.
The complete exterior finish system should be checked before work starts.
Visible and Concealed Fixing Systems Are Different
Not every fiber cement board system is designed to hide screw heads.
Some façade systems use visible fixings as part of the architectural appearance. In these cases, the screw heads may remain exposed and should be aligned consistently.
Other systems require concealed or filled fixings before painting.
Before installation, confirm whether the project uses:
- Exposed architectural fixings
- Colour-matched visible screws
- Filled and painted fixings
- Concealed mechanical fixings
- A separate cladding layer over the board
Do not fill exposed fixing systems unless the design and manufacturer instructions require it.
Use a Mock-Up Before Large-Scale Finishing
A small mock-up can prevent large finishing problems.
The mock-up should include:
- Actual board
- Actual screws
- Actual filler
- Actual primer
- Actual paint
- Planned fixing depth
- Planned sanding method
- Final lighting conditions where possible
Inspect the mock-up after all materials have dried and cured.
This helps confirm whether screw heads, filler patches, texture differences, or paint variations will remain visible.
Common Mistakes to Avoid
Avoid these common mistakes:
- Using the wrong screw type
- Leaving screw heads proud
- Driving screws too deeply
- Hiding poor fixings with thick filler
- Using filler not designed for cement-based boards
- Applying one heavy filler coat
- Painting before the filler has cured
- Filling over dust
- Sanding unevenly
- Skipping primer
- Using unsuitable internal filler outdoors
- Ignoring frame or board movement
- Painting over corrosion
- Assuming another paint coat will hide the defect
- Skipping a mock-up on high-visibility projects
Most visible fixing defects begin before the paint is applied.
Pre-Paint Inspection Checklist
Before painting fiber cement boards, check:
- Are all screws suitable for the board and frame?
- Are screw heads seated consistently?
- Are any screws proud or overdriven?
- Is the board surface undamaged?
- Are all fixing recesses clean?
- Is the filler compatible?
- Has the filler cured fully?
- Are filled areas smooth?
- Are there visible depressions or raised patches?
- Is the surface dry?
- Is primer required?
- Has the wall been inspected under side lighting?
- Is the paint suitable for the board and exposure?
- Has a mock-up been approved where necessary?
This inspection should happen before the final finish hides the fixing work.
Frequently Asked Questions
Why can I see screw heads through the paint?
The most common causes are incorrect screw depth, filler shrinkage, poor sanding, uneven primer absorption, frame movement, or corrosion.
Can another coat of paint hide visible screw heads?
Not always. If the surface is raised, sunken, cracked, or contaminated, another paint coat may make the defect more noticeable. Correct the fixing and filler area first.
What filler should be used over fiber cement board screws?
Use a compatible filler or repair compound suitable for cement-based boards, the filling depth, the exposure conditions, and the final coating system.
Should screw heads be filled on every fiber cement board system?
No. Some systems use visible architectural fixings. Confirm whether the specification requires exposed, concealed, or filled screw heads.
Why do filled screw holes sink after painting?
The filler may have been applied too thickly, painted too soon, mixed incorrectly, or used on an unsuitable surface. Some fillers also shrink as they dry.
Can rusty screw marks be painted over?
The cause of corrosion should be corrected first. Replace unsuitable fixings where required and prepare the affected area before repainting.
Final Thoughts
Fiber cement board screw heads showing through paint are usually a sign that part of the fixing or finishing process needs improvement.
The cause may be an incorrectly seated screw, excessive fixing depth, filler shrinkage, poor surface cleaning, early painting, uneven sanding, missing primer, moisture, movement, or corrosion.
The best results come from treating fixing and finishing as one complete process.
Choose the correct screw. Install it at the correct depth. Use compatible filler. Allow proper curing time. Sand carefully. Prime correctly. Then apply the final coating.
When these steps are followed, fiber cement boards can provide a clean, smooth, and professional painted surface without distracting screw-head marks.
👉 Visit the Smartfiber Fiber Cement Board page to explore specs, sizes, and delivery options.
Authored by Smartcon Int’l. Trade & Marketing Ltd. on 13.07.2026. All rights reserved.
Façade specification
Need the right board for your façade system?
Share the façade build-up, exposure conditions, finish and documentation requirements. We can help assess the appropriate board and coordinate supply.